Needles and a Pen » Knitting, Sewing, and Nursing School

Masthead header
Needles and a Pen bio picture
  • Welcome to my blog!

    Hi! I'm Traci. I'm a Registered Nurse who loves quilting, knitting, cross stitch, and the great outdoors. In my pre-scrubs life, I owned Real Photography, and you can still see my old wedding and portrait photography site here .

    I've created a map that shows links to our camping/hiking/general family fun review posts that you can find here. It's pretty much the coolest thing on this site. Thanks, Google!

    I great big puffy heart *love* comments, so please let me know you visited! I try to always reply!

Sew Together Bag | Pattern Review

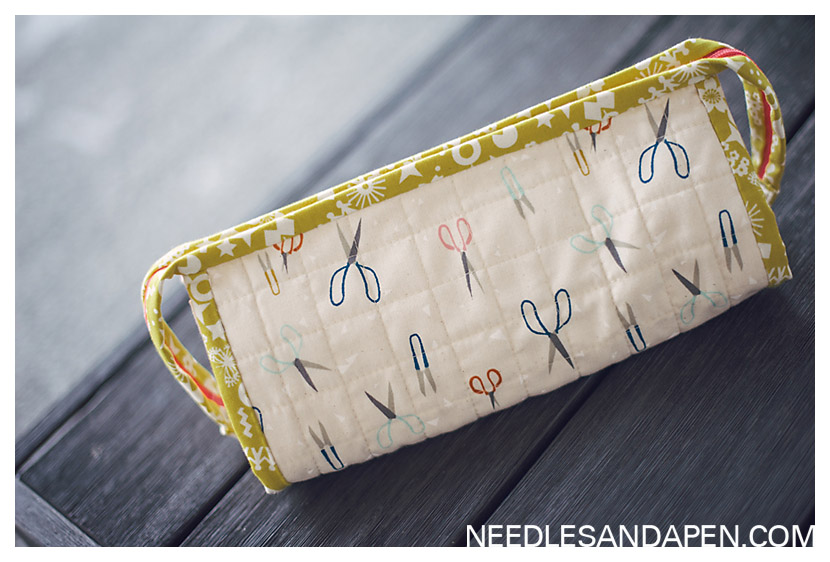
On the very first day of the year I had my first finish! I am excited to do more sewing this year, and the Sew Together bag has been on my list since it came out (about a hundred million years ago). It is the absolute perfect English Paper Piecing bag and since I’ve been hauling that project to work it’s exciting to have a better solution than my old ziplock bag + little wallet pouch.

It is a DREAM to sew a popular project many years after its release because there are a ton of ideas and tips online.

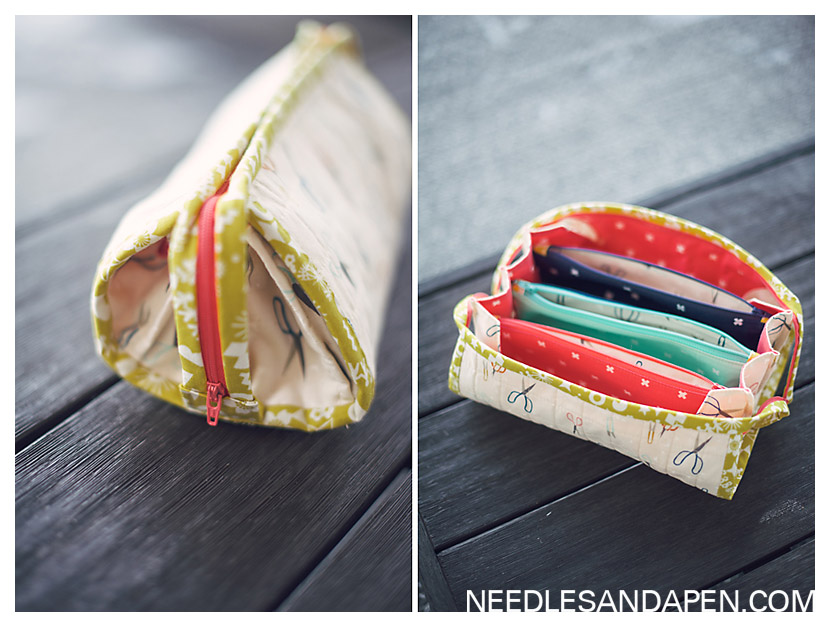
I used the Quilt Barn sew along for this project and it was enormously helpful. I will say that it’s hard to judge how involved a step will be by how things are broken up, so don’t feel like each day will involve the same amount of work. Day 1 is a breeze. Day 2 is very involved (zipper day), Day 3 and 4 are relatively quick, and then Day 5 is a long slog to the end (especially if you hand sew the binding or are piecing the exterior section that day).

My instagram buddies saved me a lot of frustration by telling me to just commit to hand sewing the binding on the bag. This makes a huge difference I think!

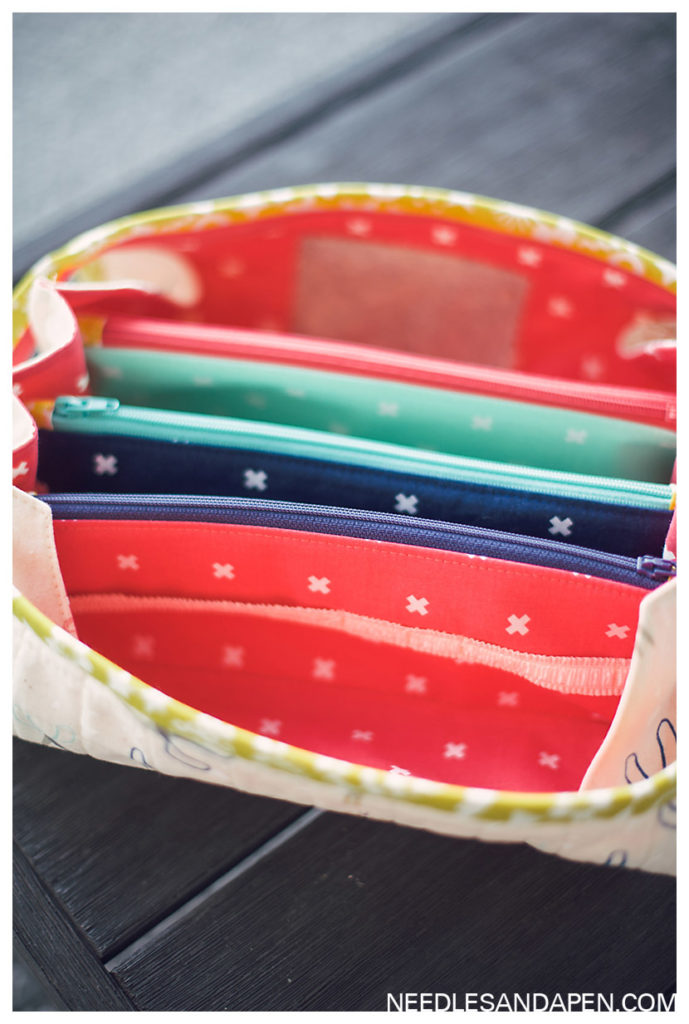
I added a couple of details that I saw online. I switched the middle zipper to a different orientation which I thought was cute, but I feel like it’s a little impractical and I wouldn’t do it again. I LOVE the elastic strip I added and wish I had done another one. Or maybe three–one in each open pocket. I included a needle landing felt pad but skipped the pin cushion.

I lost a TON of time being indecisive with fabric. There are soooo many options for placement and you can get REALLY scrappy with this one, and it being my first big project in a while I went back and forth on a lot of things, even cutting out sections, deciding against it, and then recutting. (The side zipper tabs were first green, then navy blue, then back to green for example.) I am already thinking about my next one and trying to make good fabric choices BEFORE I cut!

Details: Pattern is Sew Together Bag. Lining fabrics are Cotton and Steel basics. Exterior fabric and binding is from the Cotton and Steel Paper Cuts line.

Halloween Costumes 2018 | Retro Sci Fi B Movie Theme

We were late settling on a Halloween theme this year, which is pretty unusual for us, but we ended up going with retro sci fi based on this amazing cardboard spaceship I saw on pinterest.  We used the same Makedo cardboard construction kit.   The screws are AMAZING and the kids had so much fun with them we bought extra screws and then additional sets for Christmas gifting.  I had thought sadly how much Will would have loved the kit when he was little but he was just as excited about it at 12 as I think he would have been at 5!

Ellie’s spaceship was crafted using this umbrella (we used black duct tape to hold it to the cardboard and this LED strand of lights.  The flickering modes make it so stinking cool!  The silver clothing items (with the exception of my skirt which I made) were from Amazon.  The tiny sizing makes it tricky so be sure to read reviews–most of these are Asian sizing so a large is basically an extra-small.

Nic’s boots were these black rainboots spray painted, and his glasses were also from Amazon.

Will had some great 80s sunglasses from Amazon which didn’t quite fit our theme’s era, but they were just so stinking cool we couldn’t resist.  Here is a link to the individual LEDs we used for our non-spaceship costume items.  The light-up shoes I’d ordered for him didn’t arrive in time, so I got these instead.

My hoop skirt was a wreath form we cut apart and painted and then held together in three places with clear jewelry line.  For our blaster we spray painted this toy.

Happy Halloween!

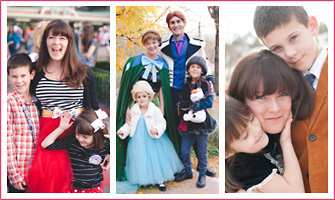
Bridget =) - These costumes are amazing! Amazon has everything, huh??? LOL

Traci - Yes! Amazon bails me out of all of my tricky shopping situations! Men’s shiny silver pants? Check. Individual LED lights? Check. Weird space sunglasses? Check. They even thoughtfully included for free the cardboard for the DIY sections! ;D

Maria McConnell - Hi, Tracy,
You shot my daughter’s senior pix in the 2009-2010 school year. I would really like to buy the soft copies of those pix if that is possible. Her picture is still up on your website. Her name is Francesca McConnell. She’s the dark haired girl in the long-sleeved blue shirt. The background is sort of golden light. Her shot is the 15th pic in your teens section. Please contact me as soon as you can. I’m putting together a collage of my three daughters’ pix as our last daughter is graduating this year. I’d very much appreciate hearing from you. Thanks so much for your time.
Maria McConnell
P.S. I’m leaving this note at all your “contact” sites in the hopes to catch you somewhere. 🙂

Poke ball trick-or-treat bag tutorial | Pokemon Halloween Costumes

I have about four years worth of Halloween posts to catch up on, but I thought I’d start with this tutorial for anyone trying to crank out a Pokemon themed trick or treat bag before Wednesday!


Note:  I am pretty loosey-goosey in the sewing room, so please understand that these directions assume a basic understanding of sewing techniques and bag construction are not beginner-friendly.

  • Assemble red, black, and white fabric.  I used cheap solids quilting weight cotton from JoAnns and estimate you need 1/2 yard of red, 3/4 yard white, and 1/3 yard of black fabric for one bag depending on how large you end up making your circles.  (I had one yard of each and had plenty of leftover fabric after making two bags.)
  • Find a large circle to use as a template.  I started with this platter but ended up using a lampshade.  Just find a big circle to trace.

Your measurements in this next section will depend on your circle and how much fabric you’re willing to waste.  I sewed my approximately 10″x20″ pieces of of red and white fabric together with a 1.5″ (finished to 1″) black strip in between them.  You’ll need two of these panels for each bag (the front and back pieces).

If you’re using a plate, you can use a quilting ruler to make sure you get your black strip centered when you trace around the circle.  I ended up using a lampshade for a larger circle and lining up in interior wiring to get my black line centered.  While you have your circle template out, cut two additional circles from your white fabric–this will be the lining of the bag.

You now have two striped circles and will add the center circles.  To make the center circles I traced around two different glasses.  I then used fusible interfacing to adhere the white circle to the black before sewing it down with the raw edges showing.  You can see in this picture that I ended up trimming down the black circles a little bit.

I feel like raw edges on circles are fine for a Halloween bag, and the fusible interfacing kept them from fraying.

Next up comes the straps.  You can use whatever method you like best.  I didn’t feel like fishing them through with the tube method, so I used the double fold method, but either would work just fine.  Black webbing would also work great as a premade option.

I don’t have a photo for this next step, but you’ll want to baste the straps into position.  Mine were about 5-6″ apart, but it will depend on the size of your circle, so just play around until it looks right to you.

(Warning, particularly un-beginner friendly section ahead.)  Having basted the straps into position you’ll take your front panel and sew it right sides together with one of your white lining circles, but leave a 2″ unsewn gap at the bottom.  You’ll then pull the whole thing through this gap.  Smooth out the curves and then press it.  You should have a flat circle with a handle at the top and a small unsewn section at the bottom that you can close up by hand if you’re picky or machine if you’re not.  Repeat with your back panel.

Place the front and back panels right sides together and sew them together, leaving an opening at the top as wide as you feel is desireable.  Triple or more stitch at the start and end to really secure the opening of the bag and prevent it from slowly pulling apart as the trick-or-treating gets serious.  Then invert the bag so the lining pieces are together and voila, you’re done!

Happy Trick or Treating!

Circle Skirts with Directional Fabric Tip | Tilly Circle Skirt Review

For Ellie’s first day of school I knew I wanted her to have something with this adorable Heather Ross print from the Kinder line.  I decided on a circle skirt and while I had made circle skirts just by the numbers before, I’ve never been 100% happy with the waistband and decided to try out the Tilly Circle Skirt pattern from The Simple Pattern Company  The pattern is made for non-directional fabric, but it was easy to change for directional fabric, and this technique will work for any circle skirt pattern.

How to use the Tilly Circle Skirt Pattern with directional fabric (tips for an intermediate sewer):

  1. Print out and cut the pattern per the instructions.
  2. Fold the pattern piece in half.  Originally the pattern piece shows you 1/4 of the skirt.  Your piece will now be 1/8 the size of your final skirt.  The original pattern makes a skirt that is one piece of fabric–yours will have 8 individually cut panels to ensure they are all right side up.
  3. Instead of folding the fabric and cutting one single circle, you will cut 8 panel pieces.  Since you will have seam allowances on each side where the original pattern had none, you’ll want to add 1/4″ to each side of your panels.  (You can eyeball this or trace out a new pattern piece depending on your level of Sewing Type A-ness.)  If you wanted to you could fold your fabric selvage to selvage and cut two pieces at a time but I was being picky about which parts of this fabric I wanted to make sure were showing, so I fussy cut each individual panel.
  4. Sew the 8 panels together to form a circle, then proceed with the original pattern instructions.

I really loved the Tilly Circle Skirt pattern waistband.  Placing the elastic only on the back half of the waistband and using three different channels gave it a much more Ready to Wear look than my previous circle skirt attempts.  Yes you can follow a free circle skirt tutorial online and run the math yourself, but the great waistband option in this pattern made it worth the money in my book!

Baa-ble hat pattern take two

When you love a knit as much as this one, you pretty much immediately have to make a second!  I wanted to see how this blue would look as the sky, and I love it!  My only disappointment in my second baa-ble is that I made an actually babble this time (the world’s most expensive pompom when it’s made out of Plucky yarn!) and for whatever reason, as a pompom with mainly the cut ends showing, the pompom looks much greener than the yarn did on the hat and so I had to keep it off the hat!

Isn’t it crazy that the exact same yarn looks green in a pompom but blue knit up?!

linen knitting bag

Three years ago I made this knitting bag and I finally got around to making my sister-in-law one as a birthday gift.  I just love the combination of the linen with this floral.  The pattern is a bit fussy to make (there has got to be an easier way!) but I love the result!